How to Share an internet connection from your laptop to your AvaLAN AP
Sharing Your Laptop’s Internet Connection to Configure Your In-Store Access Point (AP)
Sharing your laptop’s internet connection with your in-store AP can be a convenient way to get the device online and configured with the AvaLAN Cloud. This guide applies to Windows 7, 8, 10, and 11.
Step 1: Open the Control Panel
-
Click on the Start menu and search for Control Panel, then open it.
Step 2: Navigate to Network Settings
-
In the Control Panel, search for Network and Internet.
-
Then click on Network and Sharing Center.
Step 3: Open Adapter Settings
-
On the left-hand side, click Change adapter settings.
Step 4: Configure Wi-Fi Adapter
-
Locate your Wi-Fi adapter.
-
Right-click it
Click Properties.
Step 5: Enable Internet Connection Sharing
-
In the Wi-Fi Properties window, click on the Sharing tab.
If you have multiple adapters:
-
Check the box labeled "Allow other network users to connect through this computer’s Internet connection."
-
In the dropdown menu, select the adapter connected to your AP (typically labeled Ethernet).
-
Click OK.
If you only have one adapter visible:
-
Check the box labeled "Allow other network users to connect through this computer’s Internet connection."
-
Click OK to confirm.
Note: You may receive a notification informing you that a static IP address will be assigned to the Ethernet adapter. This is expected and necessary for internet sharing to function. Simply click OK to continue.
To Disable Internet Sharing
To turn off internet sharing later, return to the Wi-Fi Properties > Sharing tab and uncheck "Allow other network users to connect through this computer’s Internet connection." Click OK to apply the changes.
Verifying AP Connectivity
To confirm that your AP is connected and has obtained an IP address:
Download finder.exe
Run the finder.exe utility.
-
If prompted by your firewall, click Allow.
-
- Once the utility opens, click Search to scan for devices.
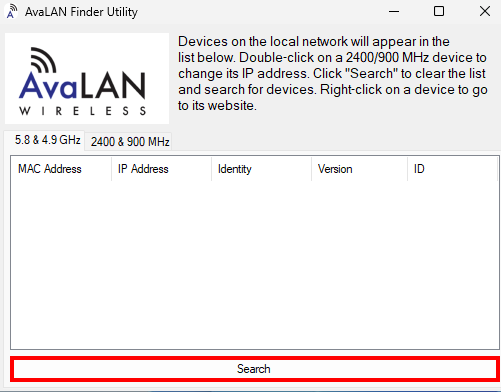
Expected Results:
-
Your AP should appear with an IP address in the 192.168.137.x range (where x is any number between 1 and 255)
-
You may see additional devices listed; these are typically IDSUs (in-dispenser units). Once the AP updates, these will no longer appear.
If your AP is listed with a valid IP, you can now contact AvaLAN Support to verify if the device is online.
Related Articles
Wireless AP Beep Codes
The AvaLAN wireless Access Point (AP) employs a series of beep codes that provide audio feedback about its current status and operation mode. These audible indicators are specifically designed for use with the in-store AP model, offering valuable ...How to Use the AvaLAN Pairing Key Generator
Obtaining the E01 MAC Address To complete the pairing process, you will need to obtain the E01 MAC address from your AvaLAN IDSU. This can be found on a sticker located inside the device, adjacent to the Cloud ID sticker. Please ensure that you note ...IDSU Pairing Process
To pair the AvaLAN IDSU with the in-store AP, please follow the steps outlined below. In the event that your experience deviates from the described process, please refer to our Troubleshooting Guide below for assistance. What you will need: The IDSU ...How to troubleshoot SPM Pairing
Understanding the "Pairing" Process The term "pairing" refers to a critical three-step communication process required between the Secure Payment Module (SPM) and the ANTX board within the fuel dispenser. A failure to "pair" typically means a failure ...How to Remake an IDSU's Pairing Key
Obtaining the E01 MAC Address To complete the pairing process, you will need to obtain the E01 MAC address from your AvaLAN IDSU. This can be found on a sticker located inside the device, adjacent to the Cloud ID sticker. Please ensure that you note ...